Step 1
Select Tenjin as the Tracker

If your product is for iOS, also select Tenjin as the SKAdNetwork Conversion Tracker.Step 2
Select Tenjin S2S as the Tracker Template

Tracker templates are used for specific cases, such as:
- Web campaigns via Tenjin tracking links
- Redirect-only tracking
- Other custom scenarios

Use alternative templates only if you are familiar with their purpose.
For most cases, the Tenjin S2S template is the recommended default.
Step 3
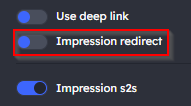
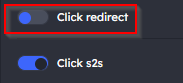
Disable both Impression Redirect and Click Redirect toggles.
Step 4
Configure the Target URL and Application Store URL based on the product’s operating system:
Android:
- Target URL: Use the full Google Play Store URL. Example - https://play.google.com/store/apps/details?id=com.google.android.youtube
- Application Store URL: Use a Google Play deep link in the following format: market://details?id=PACKAGE_NAME. Example - market://details?id=com.google.android.youtube
- Enable the Use Deep Link toggle.

iOS:
- Target URL: Use the App Store URL. Example - https://apps.apple.com/app/id544007664
- Application Store URL: Use the same App Store URL. Example - https://apps.apple.com/app/id544007664
- Disable the Use Deep Link toggle.

Step 5
Fill in the Tracker Token field for both Impression S2S and Click S2S.
For example, if your Tenjin tracking link looks like this:

https://track.tenjin.com/v0/bidease/XYZ?advertising_id={{.IFA}}&click_id={{.BidID}}&site_id={{.AppBundle}}&creative_name={{.CreativeID}}&campaign_id={{.CampaignID}}&bundle_id=com.example&platform=android&redirect=false

The value XYZ is your Tracker Token, which should be entered in both fields.
Step 6
Add or adjust Query Parameters as needed. When finished, click Save.
Was this article helpful?
That’s Great!
Thank you for your feedback
Sorry! We couldn't be helpful
Thank you for your feedback
Feedback sent
We appreciate your effort and will try to fix the article